11 Ways to Increase Website Speed & Performance on WordPress in 2021
Site speed is one of the most important elements of the success of your website, it’s just as important as having quality content that meets the need of your reader or customer. In 2021 it’s more important than ever to get your website passing Google’s Core Web Vitals, which I did with these methods.
However unless you’re really proficient at web coding it might feel like an impossible task to increase website speed without paying an expert.
As a fellow non-proficient web coder person I want to share some simple ways you can improve not only the speed of your blog, but your overall website performance and your SEO ranking with Google.
Since I use WordPress.org some of these recommendations are specific to improving your wordpress site speed but the principles apply to all websites.
Updated on 7/9/2021.
Disclaimer: This post may contain affiliate links. Using them gives me a small commission at no additional cost to you. You can read my full disclosure here.
Table of Contents
Why does your website or blog need to be fast?
In order to get traffic to your blog it’s loading time needs to be fast. Think about your own preferences when you’re browsing a website. Do you like waiting forever for it to load? No way, you want to get to the information you need as quickly as possible.
People visiting your website are they same, they don’t want to wait more than a few seconds for the page to load, and if it takes too long they exit your site and look somewhere else.
Google actually knows how fast your website is, and if it’s too slow your ranking will drop behind other sites that are faster, even if your content is better.
As we discussed in SEO Basics for Bloggers, your website’s speed is part of on-site Search Engine Optimization. The better your SEO the higher you will rank in Google’s search results and the more traffic you will get.
Studies by Google show just how your site speed affects your bounce rate. The slower your page is, the more likely people are to leave.
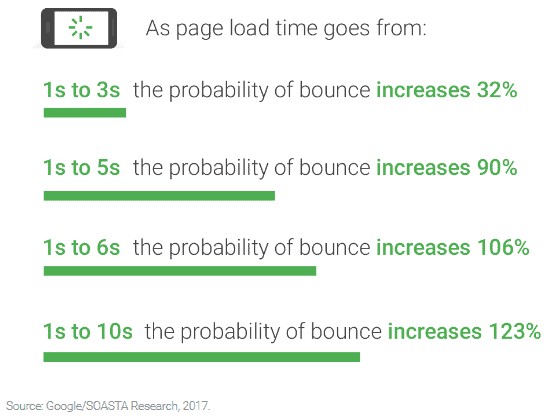
You obviously don’t want to lose a potential reader or customer, so you need to prioritize increasing your website speed.
How to Test your Website Speed
There are a few websites that will help you test your site speed, and they will tell you what you need to fix. Now some things go over my head as this isn’t my area of expertise, and you’ll probably feel the same way, but you should be able to fix at least a few things without professional help and we’ll discuss what those things are.
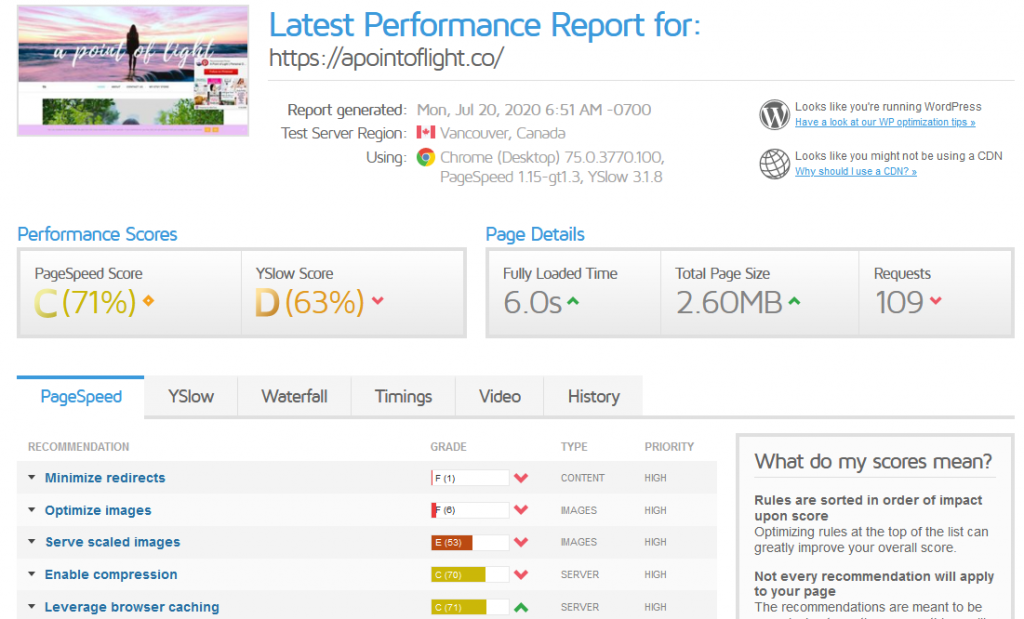
First is GTMetrix. Below is the score and data they gave my personal development blog A Point of Light before I implemented the things I’m sharing in this post. I’ll show you my new scores at the end of the post.
Next is googles speed checker, Page Speed Insights. This one gives you a simple rating from 1-100 and shows the difference between your mobile and desktop stats.
Every page on your website may have a different speed, and the most important pages to test are your blog posts or product pages as those are what you want to show up in Google. I love this bulk page speed tester as it will show you results for ever page on your website.
I tend not to like browsing the web from my phone but my Google Analytics shows that 80% of my visitors are on their phones, in fact Google puts more weight on your mobile score so your priority should be to increase your wordpress website speed in mobile.
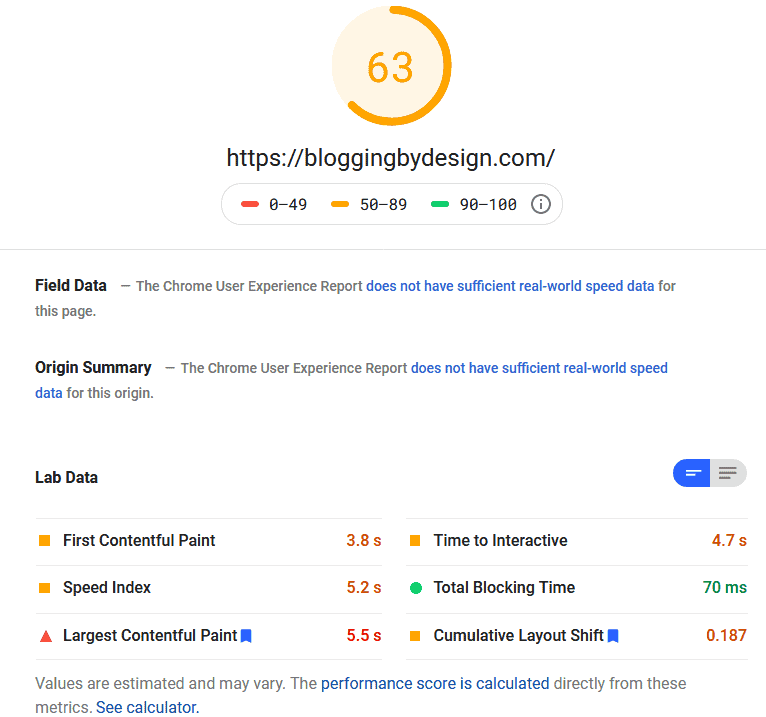
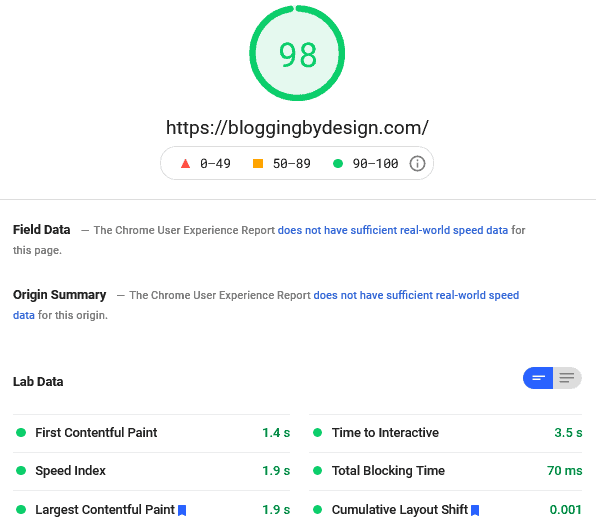
This are my before and after mobile scores. Huge difference!
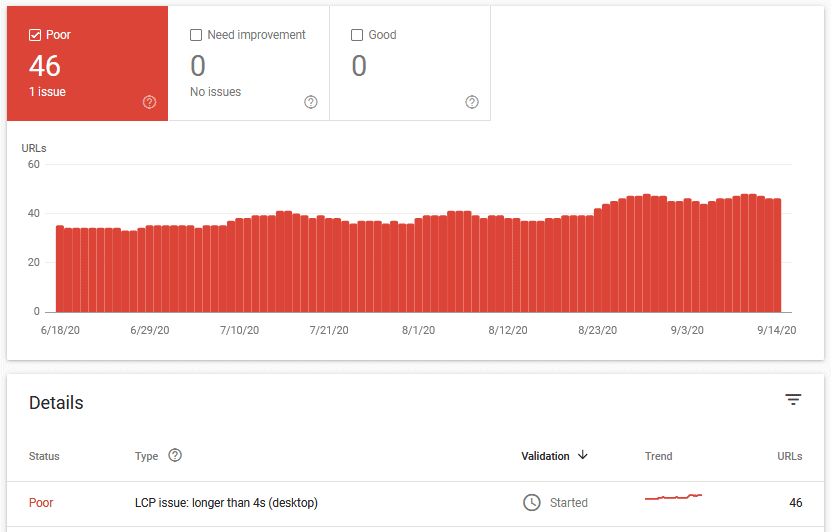
If you go to Google Search Console it will tell you your links are ‘poor’ if you’re LCP (Largest Contentful Paint, the largest element that loads first) is over 4 seconds. I probably don’t have to tell you that they aren’t going to put your link at number one in search results if your site is ‘poor.’
Lastly you can also use Pingdom. This one doesn’t explain things quite as well so it’s my least favorite, but it’s good to see if you have any gaps the other two aren’t catching.
How to Improve Your Website Speed and Performance
1. Use a Lightweight Blog Theme
The theme, or design, of you blog can also determine the speed of your blog.
Some themes might look really cool but have flashy elements that end up slowing your website.
I do not recommend using a theme that requires a pagebuilder like Elementor, it’s uses coding that just slows down your site.
I recently switched my theme for both of my websites over to Kadence, which has a free version that is way more customizable than the free versions of Astra or Generate Press.
Kadence is incredibly fast and allowed me to get rid of the Pagespeed Ninja and Autoptimize plugins because it improve my score without them! It took my mobile Cumulative Layout Shift (CLS) from about 0.1 seconds to 0.05!
Tip #1 got it down to 0.02.
Kadence also has a plugin called Kadence Blocks that works with Gutenberg and allows you to build pages like you would with Elementor, without slowing down your site at all. Just look on Youtube for tutorials to learn how to use it.
2. Use System Fonts
Many people probably don’t realize that using fancy fonts can slow down your website because it has to load those fonts from an outside source.
Using system fonts speeds up your website because they are loaded from your database.
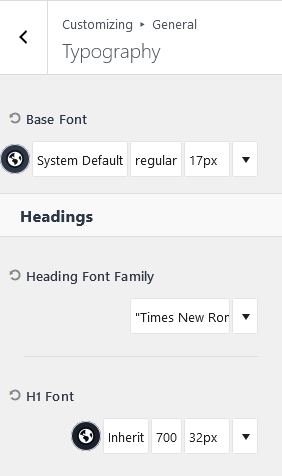
To make this change if you’re using Kadence go to the theme customize page, then General -> Typography -> Base Font: System Font.
I set my heading font to Times New Roman as it’s also a system font.
I also recommend setting your font size to 17-18px as it’s better for mobile users and if you have ads can help with your RPM.
3. Size your images correctly
Having correctly sized images is vital to the speed of your blog. The bigger the file size the longer it takes to load, so you want your images to be the right size. This is called serving scaled images.
First, make sure your photos are jpeg if they are colorful, but if they are white with text then png is fine. In the next section I talk about ShortPixel, which is a plugin that can do this for you automatically so you don’t have to go back and change them manually.
Then resize your photos. Your theme should tell you how big your header image should be, but generally you don’t need your post header (featured image) and images to be more than 1000 px wide.
If you have images in your side bar, make them the exact width your sidebar is, which will be around 300 px. My ranking on GTMetrix went up when I did this.
4. Compress your images with Smush or ShortPixel
After making your images the correct size you need to compress them as much as possible without reducing the photo quality. If you use Photoshop you can do this when you save your file, but there are websites that will do this too like tinypng and imagecompressor.
Manually doing this to each image can be a pain, luckily there are free plugins that will do this for you like Smush. However, I recently tried ShortPixel and it does an even better job at compressing images. It is a paid plugin but you can get 100 images per month for free, or you can buy packages like 10,000 images for $10 or 30,000 for $20 etc.
5. Preload key requests
When you use PageSpeed Insights you might get an a prompt to preload key requests, and you can see that it will give an estimated speed improvement of over 3 seconds.
If you have the Grow (formerly Social Pug) plugin you may see this too if you scan a page using the plug in, you’ll treat this the same way.

To fix this you can preload your font, this basically means you’re moving it to the front of the line. You don’t want to do this with everything because too many requests slows loading speed down, and that defeats the purpose of trying to speed up your site.
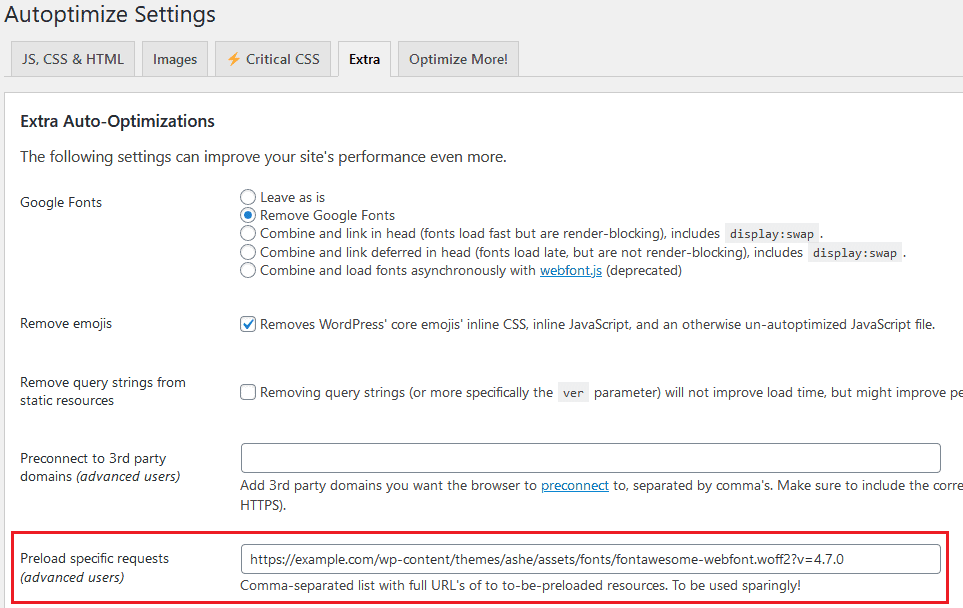
You can use the plugin Insert Headers and Footers, or you can use Autoptimize.
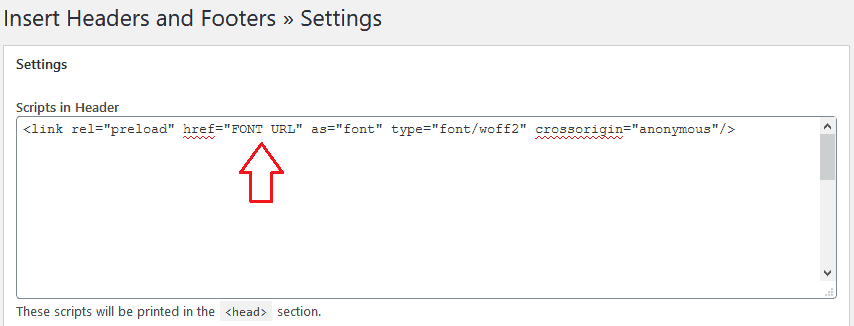
With Insert Headers and Footers you’ll copy the code below
<link rel="preload" href="font.woff2" as="font" type="font/woff2" crossorigin>Then paste it into the Header section and add the URL that PageSpeed gave you (right click on the url and select ‘Copy Link Location’ or ‘Copy Link Address’ depending on your browser).
If you install the Autoptimize plugin you can just paste your URL into the box highlighted below on the Extra tab.
6. Reduce unnecessary plugins
While there are plugins that are very helpful and necessary, there are some that you really don’t need and should avoid. Many plugins slow down your website, so it’s important to just have good quality plugins.
Something that a lot of bloggers use but really don’t need is an Instagram feed plugin. They slow down your site a lot and a simple follow icon will be just as effective.
Some themes have social icons built in, but I use the Simple Social Icons plugin in my sidebar.
7. Minimize Ads
Ads are a good way to earn money on your blog, but the wrong kind of ads and too many will slow down your website.
You have to balance your need for ad revenue with the need to rank well on Google and keep people on your website.
On A Point of Light I have Mediavine ads which are one of the best companies. There is some speed reduction but with the tips I’ve discussed here I still get great speed.
8. Install a Cache Plugin
A browser caching plugin like W3 Total Cache will reduce the loading time of your website because it ‘remembers’ various elements of your site so they don’t have to be loaded from scratch when someone clicks to a new page on your site. This makes the page load faster and reduces the demand on your server.
9. Install Autoptimize
Autoptimize does what it says, it automatically optimizes your website to make it faster. I saw a huge improvement with this plugin on my old theme and highly recommend it if you aren’t using Kadence.
You may need to play with the settings, I decided to not have it optimize my images on A Point of Light because I already have ShortPixel and it was making some images not load on my home page.
It would be a good idea to backup your site before you play with the settings, if you don’t already have a plugin to backup your site Updraft Plus is a good one.
Or if your host has an option to create a staging site test out everything there. Just google your host + staging site or chat with them.
Always check your site after each change on more than one browser. Something can look fine on Chrome but buggy on Firefox.
10. Page Speed Ninja
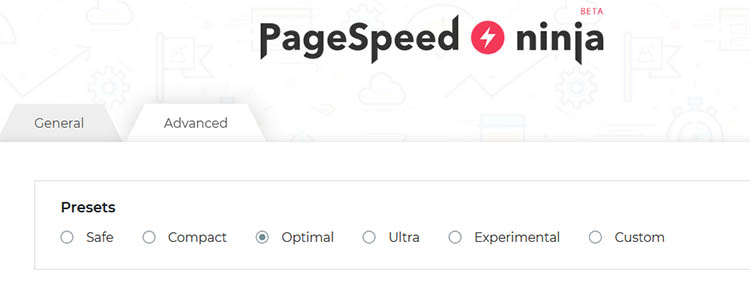
Page Speed Ninja took my website (before using Kadence, now I don’t need it) from a B on GTMetrix to an A. It has several options for how it can optimize your page. I had good results from the Optimal setting. Ultra worked find on Chrome but it made my page load wrong on Firefox so I went back to Optimal, so when you’re adjusting the settings make sure your page looks right on different browsers and on mobile.
Some features overlap with Autoptimize so just be aware of that. For example both have Lazy Loading options, you don’t need to have it enabled on both.
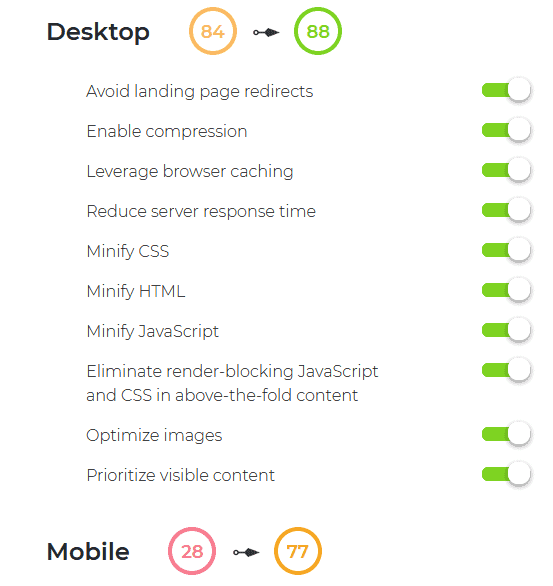
It also shows you how it’s improved your blogs performance. You can see it only improved my desktop performance by 4 points, but on mobile it went from 28 to 77! As we learned earlier most people use their phones to browse the internet, so that improvement is really important.
11. Have the Right Hosting
The host of your website can make a big difference in your site speed. As you get more page views each month you may need to upgrade the tier you signed up with, or switch to a different hosting service.
This blog is hosted by Name Hero and it’s a good choice for beginners, their customer service can suck though.
I recently switched my other blog from Bluehost (I didn’t have issues that many other talk about, I just wanted better speed) to Cloudways and it pushed my LCP from red to green. They give you a 3 day trial to test it out and their migration plugin is really easy to use, but they’ll do it for new users for free.
Get $15 off through my referral link. This will give you over a month free.
I chose the 1GB Digital Oceans plan, it’s great for sites that get up to 100k monthly views.
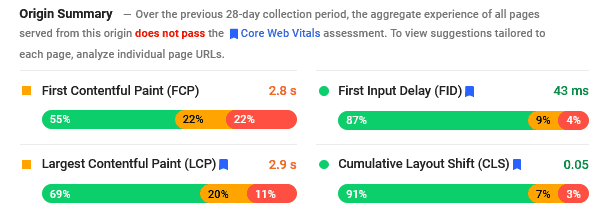
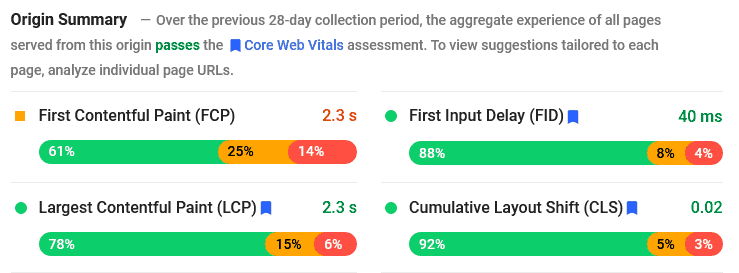
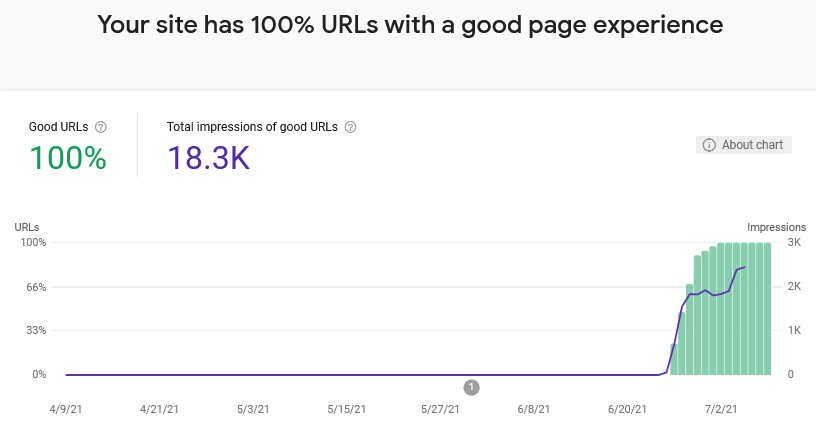
I recommend doing all the other optimizations before changing hosting, but you can see how using Cloudways got me passing Google’s Core Web Vitals. My CLS went from 0.05 to 0.02, and my LCP went from 2.9 to 2.3.
Final Thoughts on Speeding Up Your Blog
So those are my tried and true tips to increase website speed. I think if you try them out you’ll see big improvements in your website’s speed and performance. Remember to use GTMetrix or Page Seed Insights before you make changes so you can see your progress.
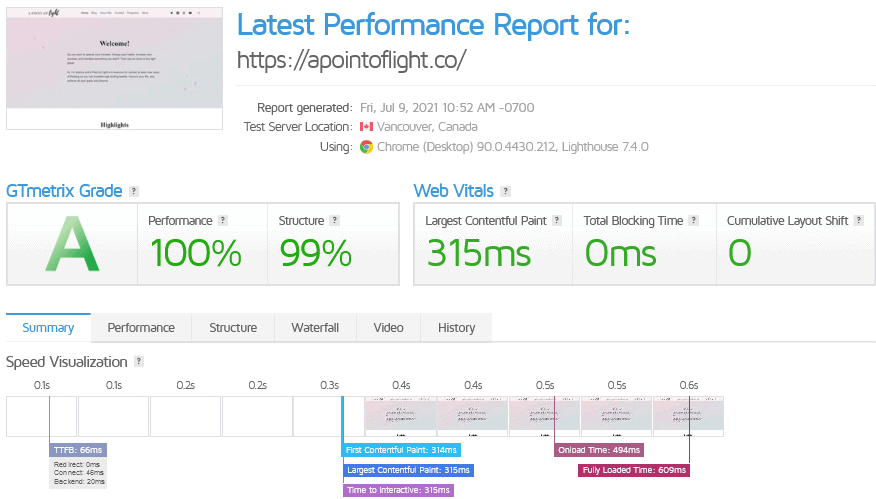
Remember when I showed you my before score on GTMetrix? My scores were PageSpeed C (71%) and YSlow D (63%) with a 6 second load time.
July 2021 Update: The total load time for my site is now 609ms on desktop!
These methods really do increase website speed! Please let me know your before and after scores if you try them. If you want more tips to make your blog a success sent to your inbox subscribe to get a weekly newsletter.


